B.V. Doctor
Naalbinding is also known as “cousin” of knitting and crochet. It predates both knitting and crochet by about atleast 2000 yrs. Naalbinding is a textile technique that uses a single, eyed, needle to create a stretchable fabric by sewing non-continuous lengths of thread in a fashion that in its most basic form is a series of buttonhole stitches / darning stitches and in more complex forms are threaded together. The thread is not pulled tight against itself forming a hard knot, but the stitches are tensioned, often around a thumb or needle, leaving a meshwork of interlocking loops of thread
Diagram of the simple buttonhole stitch variant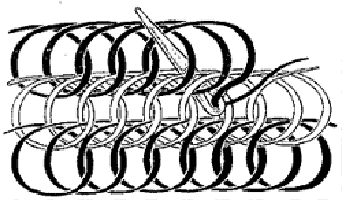
A basic method of naalbinding
In naalbinding each loop is connected to at least one on either side as well. In regular knitting, each loop is only connected to those directly above and below it.The resulting fabric is generally built spiraling up row by row and can be very elastic or quite stiff depending on the variation and material used. It was regarded as a superior craft because it required more skill to produce. The fabrics created are thicker and warmer.
The technique of working a fabric of interlocking loops with a needle and thread may be traced back as far as the neolithic period. The earliest known extent examples of nålbinding, if one is to include the buttonhole stitch versions, are from c 6500 BC found in Nehal Hemar, a cave in the Judean desert, Israel and Chinese hats from 1000 BC. The next specimens are fragments found in Denmark from the Mesolithic era of the Stone Age (4,200 BC calibrated). Since the Stone Age a number of examples have turned up. By the 5th century AD there are already a number of very complex examples. For example a sock found in Egypt from the 4th to 6th centuries AD acquired by the Imperial Museum of Austria in 1890. During the Viking Age even more examples begin to turn up. A wool sock found at Coppergate, York, England, from 970 AD with evidence of madder dye on the ankle. Two mittens from Iceland dated to the 10th century. From C4-C6 Egypt there are several examples of sandal socks worked in a form of naalbinding which resembles true knitting, and for this reason the technique is sometimes called ‘single-needle knitting’, to distinguish it from knitting on two needles.
Naalbinding is slow process because the entire length of yarn must be pulled through each stitch, but it will not run. Naalbinding can only be done with short lengths of yarn (about 18 inches), which are joined together as the work progresses.
Several different forms of naalbinding are known, from very simple to highly complicated and they are described by the course of the needle and thread through the loops already. Following is a very basic introduction to naalbinding, using the simplest possible stitch.
Start by making a loop in the yarn. The red arrow marks the end of the yarn where the needle is.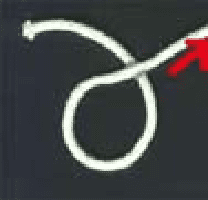
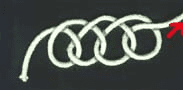
Hold this loop flat as shown above. Then put the needle through the loop from the bottom, over the lower part of the loop, under the upper part of the loop and over the loose end of the yarn. When the needle is through the previous loop, tighten it around the needle. The size needle used determines the gauge of the stitches. This picture shows a loose row of these stitches. The most recent one is on the right – trace it through the previous loop to see its over-under-over course. This stitch can be described more concisely as O/UO. The / shows the point in the over-under-over path where the yarn switches from moving deeper into the previous stitches to moving back out towards the edge of the work. Stitches of greater complexity are made by going through more than one of the previous loops and in different paths.
Since a single row of stitches isn’t very useful, the next step is to learn how to work in the round. Start by making a loop just like that in the first illustration, but larger than the one you used for starting a row of stitches. This will be the foundation for working a circle of stitches. Now work a stitch just as you did previously, but this time go through the foundation loop from the front before working the rest of the stitch.
Continue to work stitches through the foundation loop and through the previous stitch. The needle goes over then under the foundation loop, then over and under the previous stitch, and finally over the loop of the new stitch.
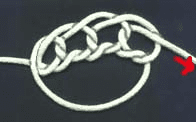
After you have a number of stitches worked into the foundation loop, pull the end to tighten this loop. Then continue working around the circle of stitches you have already made, but instead of going through the foundation loop, go through a stitch of the previous row in exactly the same way. Increases are made by working two stitches into one stitch from the previous row, and decreases are made by working two stitches together.
There are at least 30 naalbinding stitches. Up to 1024 variations of one form of naalbinding are possible.